Summer Christmas break

I would like to take this opportunity to wish you all a wonderful Christmas and all the very best for a sugar free Happy New Year!

screenshot-2016-12-16-08-25-38

I have enjoyed writing this blog over the past year and I hope that you have enjoyed taking this journey with me, learning with me more about how to reduce sugar in your diet and why it is important for your health to take this step.

I look forward to writing again in the New Year and sharing more of my journey with you.

Until then …..

Happy Holidays!

2582-11

Family Tradition

My Grandma Rose

Before Christmas I used to bake honey biscuits. My honey biscuit recipe used about two pounds of honey. They used to keep a long time. When other biscuits ran a bit short, I’d say, ‘Oh well, there’s still some honey biscuits in here’.

I’ll name the boys, you name the girls – the story of Rose Heinrich

One of my most fond memories of Christmas is my grandmother, my mum and I making honey biscuits. My grandmother use to make them on the farm in huge batches for her big family and the many visitors that came by. Everyone knew that when they popped in to see Rose there would be a cup of tea and a couple of honey biscuits ready for them.

screenshot-2016-12-02-15-41-11

Grandma Rose and her big family  – photo from the book “I’ll name the boys, you name the girls – the story of Rose Heinrich”

My mum also always made huge batches of biscuits sending tubs of biscuits to various friends and neighbours. She would also have stashes of biscuits hidden in various cupboards around the house so that my dad couldn’t find them!

 One of the most special ‘photo’ memories I have is of my mum, my daughter (around two years old) and I all making honey biscuits together. Three generations in the kitchen cooking and sampling! So this tradition will continue here in Jakarta. My daughter, now 15, is in the kitchen with me this week cooking Grandma Roses honey biscuits. We will be using her traditional recipe with only one change, we’ll swap rice malt syrup for honey. Grandma Rose’s recipe makes a huge amount of biscuits so I’ll put in brackets the amounts I use for making a much smaller batch.

Honey Biscuits- from Rose’s old black recipe book

2 lbs honey (350g malt syrup)

2 lbs white sugar (none)

6 eggs (2 eggs)

2 teaspoons mixed spice (1 1/2 teaspoon)

1 teaspoon ground cloves (1/2 teaspoon)

1 teaspoon cinnamon (3/4 teaspoon)

1 teaspoon ginger (3/4 teaspoon)

4 teaspoons bi carb soda (2 teaspoons)

a little salt

flour – enough to make a stiff dough, about 4 lbs  (580grams)

Oven set at 180 degrees

fullsizerender_2

Put honey in a dish and warm it in oven, then add sugar, eggs, flour and spices.

(I mix the rice malt and eggs in a blender then add it to the flour and spices)

Work well together.

My mum always set the dough aside in a bowl covered with glad wrap for a couple of hours, so that is what I do also.

Roll out small quantities, cut into shapes.

Bake in the oven for about 8 minutes at 180 degrees.

We like to use Christmas shapes. You can put an almond, 100’s and 1,000’s or  coloured balls  on top.

img_2190
Roll out your dough
img_4357
Cut out your shapes
img_4352
Place them on a lined tray
fullsizerender
Bake in the oven 180 degrees

When cooled you can ice them if you like – my kids used to love to help doing this.

Enjoy – 

img_4364

Christmas pudding

Christmas time already I hear you say??!!!  I am afraid to say that the decorations are in the stores and the countdown has begun. Time to start to getting organised for, as we know, the time will come around quickly enough and to avoid the Christmas rush here is something you can start on.

Christmas Pudding!!!

I know that Christmas pudding is full of sugar due to the dried fruit, alcohol and added sugar  BUT I think there are times when one needs to indulge in a moderate way to enjoy the traditions of the season. Christmas ,I believe, is one of those times. My approach is going to be to not use any added sugar and to (hopefully) only have one small piece with some sugar free custard!

The recipe I am basing my pudding on is Jamie Oliver’s Nans  I will put in brackets the changes I am going to make so you can do his full recipe or follow what I do.

Jamie Oliver’s Christmas Pudding

666_1_1439303312

“This light, fruity Christmas pudding recipe makes buying one from the shops a thing of the past ”

Ingredients

500 g mixed dried fruit, such as cranberries, cherries, apricots, sultanas, prunes and raisins

100 g dates , chopped up

3 tablespoons chopped crystallised ginger (Im leaving this out)

125 g suet (I’ll use some cold butter grated)

1 orange , zest of (I also added the juice)

125 g plain flour

125 g caster sugar (I will use a little rice malt syrup)

150 g fresh white breadcrumbs

2 tablespoons brandy (I used port just because we had some in the cupboard)

1 handful chopped nuts, such as pecans, Brazils or hazelnuts

1 medium free-range egg

150 ml milk

Method

  1. Grease a 1.5 litre pudding bowl.
  2. *I placed all my fruit in a bowl with the orange zest, orange juice and port. I covered it with cling wrap and then set it aside for 24 hours.
  3. Mix all the ingredients together. Put the mixture into the greased bowl and cover with a double layer of aluminium foil. Tie a piece of string round the side of the bowl. Place in a large saucepan with water halfway up the sides of the bowl. Bring the water to the boil, put on a tight-fitting lid, and simmer for 3 hours. Don’t forget to check the water regularly, making sure that it never boils dry, because if it does, it will burn and the bowl might crack. I used a timer for 30 minutes so that I wouldn’t forget.
  4. When it’s ready, remove the foil, turn out on to a plate and decorate it as you like. You can also light it with brandy if you want to be really fancy.  I covered mine with cling wrap and put it in the freezer.
  5. fullsizerender-2

It will be hard to let you know how my pudding turns out as we will only be slicing into it at Christmas.  I’ll sneak a little tasting when its cooked and see how it is but Im sure the longer it sits the better it will be!

I thought this was going to be a lot harder than what it was so I encourage you to have a go at making your own christmas pudding this year.

screenshot-2016-11-24-08-28-43

This is another recipe I came across when looking at added sugar free puddings.

Christmas Pudding – From Pure Harvest  

http://afreshlegacy.net/na_sponsored_post/sugar-free-christmas-pudding

sugar-free-christmas-pudding

Ingredients
  • 150 grams sultanas
  • 150 grams currants
  • 150 grams raisins
  • 150 grams apricots
  • 150 grams prunes
  • Juice and zest of 1 orange
  • ½ cup brandy
  • 250 grams butter
  • ¼ cup Rice Malt Syrup
  • 3 eggs
  • 1 cup plain flour
  • 1 teaspoon ground cinnamon
  • 1 teaspoon mixed spice
  • 250 grams breadcrumbs
  • 150 ml Pureharvest Almond Milk
Instructions
  1. Place the dried fruit in a large bowl and grate in orange zest. Pour the brandy and orange juice over the fruit and soak overnight in the fridge.
  2. Using an electric mixer, cream the butter and Rice Malt Syrup in a large bowl until it is light and creamy. Add the eggs and beat well.
  3. Add the soaked fruit to the egg mixture, along with the rest of the ingredients and mix until well combined.
  4. Spoon the mixture into either 2 x 1 litre or 1 x 2 litre pudding moulds. Line the top of the pudding with a round of baking paper. Secure a piece of aluminium foil over the puddings to ensure no water gets it.
  5. Place the puddings in a pot of boiling water (the water should come halfway up the side of the puddings) and boil covered for 4 hours for the 1 liter puddings or 8 hours for the 2 L pudding. Make sure you keep an eye on the water levels in the pots and top them up when necessary.
  6. To check whether the puddings are cooked, use oven mitts remove the puddings from the pots and test with a skewer.
  7. To store the puddings, allow to cool completely, wrap in foil and tie in calico. Store in a cool dark cupboard or in the fridge for up to 3 months.
  8. To reheat the pudding, boil covered for 30 minutes. Serve with warm vegan custard or an orange citrus glaze.
Notes
Prepare this recipe at least the day before so that the fruit can soak overnight.
Timing in this recipe is dependent on the size of the pudding bowl used. All cook time is 4 hours + additional time for reheating if not using on the day. It does not include the overnight soaking time.


screenshot-2016-11-24-08-42-59

A Victorian family gather to stir the Christmas pudding for luck. Christmas card of 1871


Feature image from – taste.com.au

Say Yes to new adventures in the kitchen!

Cooking should at times, I think, be an adventure into the unknown and untried. So in this post I am going to look at 2 recipes, one that I have made up and one that I saw on Sarah Wilsons post and thought it was too good to be true therefore had to try it.

My version of Granola


My husband loves to put granola on his breakfast in the morning and on his yoghurt at night. I have searched high and low both in Australia and here in Jakarta for a granola that lived up to its advertising claims of being healthy. I looked at the most expensive to the least and tried to avoid those with dried fruit and chocolate in order to find a low sugar or, better still, sugar free granola.

As I went shopping I took a few photos of the ingredients list of some of the granolas I can buy here in Jakarta.

img_3961fullsizerenderfullsizerender_1

One I couldn’t read as they had covered up the english writing, the second had 19g per serving (60g) – 4 3/4 teaspoons of sugar and the  last one was slightly better with 15g per serving (55g) – 3 3/4 teaspoons of sugar.

So in conclusion  – time to make my own!

The recipe that I came up with is very much “what do I have in the cupboard to use today.” There are a few stable ingredients but the amount of each and what I put into the mix changes each time.  Mix it up depending on what you like.

Here is what went in todays granola.

Ingredients –
  • rolled oats (1 – 1 1/2 cups)
  • Pepita or pumpkin seeds
  • Chia seeds
  • sunflower seeds
  • poppy seeds
  • coconut – shave/chips
  • almonds
  • linseeds – flax seed
  • 3 tablespoons of rice malt syrup
  • 2-3 tablespoons of butter or coconut oil.


Method –
  • Preheat oven to 180 C and lay a piece of baking paper out on a biscuit tray.
  • Place all the dry ingredients in a bowl.
  • In a sauce pan heat up the rice malt syrup and butter or coconut oil.  I heat some and then add more if needed.  If Im making a smaller batch I’ll make less of this.)
  • Add the hot syrup to the dry ingredients and mix until all coated.
  • Spread the granola out on a lined baking tray as flat as possible.

fullsizerender

  • Cook in a 180 degree oven for 10 minutes – if you like yours crunchier cook for longer

img_3954

  • Allow to cool
  • Once cooled place in an airtight container.

img_3956

My daughter just loves to eat it at anytime really.  She just fills a little bowl and nibbles away on it.  I am thinking that if you made it a little more sticky and put them into a log shape they could pass as a muslie bar!


The Best Chocolate Mousse

screenshot-2016-11-14-12-50-00

I saw this recipe on Sarah’s website (https://iquitsugar.com/recipe/the-best-vegan-chocolate-mousse/) and I saw that it only had 4 ingredients all of which were in my cupboard. I love chocolate mousse and I have not made one probably for 2 years now.

I was in the kitchen in no time whipping this one up.  It was made and in the fridge in less than 10 minutes – maybe even 5. Gotta love that.

Ingredients –

400 ml can coconut cream.

1/2 cup raw cacao powder.

1 tablespoon rice malt syrup.

1/4 cup chia seeds.

cacao nibs, to serve.

fullsizerender

Method –

1. Place all ingredients into a large mixing bowl. Whisk ingredients together until well combined and smooth. Pour into 4-6 serving glasses.

2. Place glasses into the fridge and allow to chill for at least 3 hours to firm up (or overnight for best results).

fullsizerender_3

3. Once firm, remove mousse from the fridge and sprinkle with cacao nibs.

I must admit first time round I did halve the recipe just in case it wasn’t a hit with the family – no need t do that next time!

2 of my family members have not been reducing their sugar intake as long as the rest of us so they did find the mousse not sweet enough. They added about 1/3 of a teaspoon of rice malt syrup to their serving snd then they were happy.  I thought it tasted wonderful and can’t wait to make it again this week.


Hope you enjoy your time in the kitchen!


Feature image – http://www.daytonfoodies.com

Bone Broth – aka Stock

This week I am going to research and write about bone broth, also known as stock.  When these words get mentioned to me I think of my Grandma on the farm, using all that she can in as many ways possible to feed her family, making bone broth as a base for many recipes. I doubt she knew of the health benefits of what she was doing, in her eyes using the  bones and seasonal veggies to make a broth just made good economical sense. We now know how amazing bone broths are for gut health and other health benefits, and bone broth can go beyond just soup. Any slow cooking of meat with its bone is going to benefit your health.

Benefits of Bone Broth

Here are some of the benefits of bone broths from various sources. (Dr Axe, Louise Hay and Sarah Wilson)

  • Treat leaky gut syndrome
  • Overcome food intolerances and allergies
  • Improve joint health
  • Reduce cellulite
  • Boost immune system
  • Helps with inflammation
  • Improve mood balance
  • Helps with weight loss
  • Helps with hydration
  • Helps to strengthen our bones and nails
  • Helps normalise stomach acid, which is useful for colitis, celiac disease, ulcers, and other inflammatory gut conditions
  • Helps with thyroid issues

9dea11f9365b31bbb1d71620c9b9ed2a

Minerals gained from bone broth are –

  • Calcium, magnesium, phosphorus, and other trace minerals, are easily absorbable, and required for general health.
  • Glucosamine and chondroitin, which may relieve of arthritis and joint pain.
  • Glycine, which may combat stress and inflammation.
  • Collagen, which is great for hair, skin and nails.
  • Gelatin, which we know to be a boon for gut health.

((iquitsugar.com/bone-broth-gelatin-cheat-health)

balancedbites_bonebroth

Sarah sums bone broth up by saying –

“If there’s one thing anyone serious about their health should learn to do, it’s to make chicken or beef stock. Stock, or bone broth is beyond nutritious and great for anyone with digestion issues.

Dr Axe says –

One of the most remarkable things about bone broth is its gut-supportive benefits, which as described above actually have a holistic effect on the body and support healthy immune system function.

But..

There is always a but – and in this case it very much depends on the way the broth is cooked and the bones that are used. Here begins my Jakarta struggle!

Bones

You want to buy animal products that you know are pasture-fed and free of antibiotics and hormones; organic produce is always best. For all the nutritional benefits, it is suggested that you use not just bones that we usually use, but also add in the neck and feet of the animal in order to truly unlock all the bone broth benefits.

Cooking time

Bone broth needs to be cooked slowly and for a long time so that you get the most out of the bones.

Add a splash (about 1 tablespoon) of vinegar. Set your crockpot on low, and cook for at least 6 hours, preferably longer. Poultry bones can go as long as 24 hours, and beef bones can simmer for up to 48 hours.

fatburningman.com/how-to-make-bonebroth-to-heal-your-gut-reverse-aging-cure-the-…

How to cook bone broth

By  Sarah Wilson

bone-broth-7


Broth is made using the bones of animals, usually land animals but it can also be made using fish bones. The bones are cooked in water with a selection of vegetables, often including things like onion, celery, and carrots. It is brought to the boil and then simmered for anything from about 2-48 hours, depending on which recipe you follow. The bones (and often the vegetables) are then discarded and the liquid is consumed like a soup or warm drink.(https://iquitsugar.com/why-everyone-is-talking-about-gelatin-and-bone-broth/)

Sarah’s  chicken stock (bone broth) recipe

image21

Makes 3 litres

  • 1 whole organic chicken (if you’re friendly with your butcher, ask for some extra bony chicken bits: necks, feet etc)
  • 3-4 litres of water (to cover chook once in the pot)
  • a splash of vinegar
  • 2 carrots, roughly hacked
  • 1 onion, roughly hacked (don’t bother peeling)
  • 2 sticks celery, hacked
  • 1 teaspoon black peppercorns
  • 3 bayleaves
  • a few sprigs thyme (if you have some)

image

Pull out the chicken and drain the stock with a sieve, tossing the veggies.

The stock: I drain the stock into another saucepan that I’ll make the soup in. This goes in the fridge for several hours until the fat congeals on top. Scoop this off and you’re ready to make soup and freeze the rest. I freeze some in portions big enough to make another batch of soup down the track (500ml), some to make into a stew or to just drink when I’m feeling crappy (1 cup) and the rest into an ice-cube tray ready for braising veggies (I pop out 2-3 into a pan and use instead of oil or butter).

The chicken: Pick off all the chicken. It will pull away super easily from the bones and the fat. I take every last bit. I keep about one-third for the soup (below) and then portion out the rest (4-5 serves) into ziplock bags and stick in the freezer for sandwiches, salads and snacks. I eat it with just pepper and salt. It tastes better than any chicken I’ve had.

8943443_orig

Sarah tells us a few things we need to know:

* Add a little vinegar during cooking

To draw minerals, particularly calcium, magnesium and potassium, into the broth.

* Keep the cartilage and joints…and eat them.

Serious. Especially if you’re a woman. It’s the best bit for you.

* Stock will keep about five days in the fridge, longer if reboiled, and several months in the freezer.

* Always use the whole chook – especially the bones and joints.

They provide the healing substances, not so much the muscle meats.

* When removing the fat layer, don’t get too finicky.

The fat is actually really good. In fact the physicians at Gut and Psychology say the fat is some of the most nutritious stuff.

* Definitely use an organic, free range chooken.

It’s worth the investment. (How much do you spend on commercial stock? Tylenol? Gut medication?)  Remember, everything is going to leach from this thing. Do you really want chemicals and bleaches percolating in your soup?

(sarahwilson.com/…/how-to-make-chicken-stock-and-my-mums-chicken-soup)

lowres-0853

Happy Cooking

Feature image – bone-broth-gelatin-FRAME.jpg

Images –

9dea11f9365b31bbb1d71620c9b9ed2a.jpg

balancedbites_bonebroth.jpg

bone-broth-7.jpg

lowres-0853.jpg

8943443_orig.png

Anyone for soup?

This week I am going to start with a confession – I love soup!

Soup is my go-to food when I don’t know what else to eat. It reminds me of my childhood when my mum in winter use to make big potfuls of soup especially pea and ham. Its a quick, easy, healthy meal. And when you start looking into the world of soups the possibilities are endless. From all of the world each cuisine has soup on its menu.

cropped-header2

Soup is all great for your gut health. If you can make your own bone broth then you will have a very happy gut. Sarah Wilson gives bone broth tips here – http://www.sarahwilson.com/2012/01/how-to-make-bone-broth-and-why-you-should/

This week on the menu there is a roasted tomato, pumpkin, red lentil and thai white lipstick soup.

I will also look at what is in a can of soup and hopefully inspire you to make your own.

Roasted tomato

Ingredients
  • 5 large fresh tomatoes cut into quarters
  • 3 cloves garlic, peeled
  • 1 onions cut into quarters
  • some extra-virgin olive oil
  • Salt and freshly ground black pepper
  • 3 cups vegetable stock
  • Handful of chopped fresh basil for garnish (optional)

img_3757

Method

  • Place tomatoes, onions, and garlic on an oven tray and cook on 180 degrees for around 30 minutes.
  • Remove roasted tomatoes, garlic, and onion from the oven and transfer along with any roasting juices into a large stock pot. Add the vegetable stock.  Bring it to the  boil, reduce heat and simmer for 20 minutes or until liquid has reduced by a third.
  • Puree the soup until smooth.
  • Season to taste with salt and freshly ground black pepper.
  • Garnish in bowl with chopped fresh basil or parsley.

fullsizerender

Pumpkin soup

Ingredients
  • Fresh pumpkin cut into cubes – I used half a butternut pumpkin
  • 2 cloves garlic, peeled
  • 1 onions cut into quarters
  • 2 small potatoes, peeled and chopped
  • Salt and freshly ground black pepper
  • Vegetable stock
  • Handful of chopped fresh parsley

FullSizeRender-2.jpg

Method

  • Place pumpkin, potatoes, onions and garlic and stock into a saucepan and cook until tender.
  • When tender blend until smooth
  • Season to taste with salt and freshly ground black pepper.
  • Garnish in bowl with chopped fresh parsley.

mag_recipe_polars_pumpkinsoup

Red lentil 

Ingredients

  • 500g red lentils
  • 1.5 litres of chicken stock
  • 1 fresh tomato cut up
  • 1 large onion
  • 2 garlic cloves
  • cumin for seasoning
  • salt and pepper for seasoning

img_3744

Method

  • Wash lentils until water runs clear
  • Place lentils, onion and tomato in a saucepan
  • Add stock and cook until lentils are soft
  • Puree
  • Add salt, pepper and cumin to season
  • Serve with a small amount of fresh parsley on top

FullSizeRender-2.jpg

Thai “White Lipstick” – Tom Kha Gai

(recipe from Pum’s Lazy Cuisine )

  • 100ml Coconut milk
  •  1 Handful of Chicken thinly sliced
  •  170ml Water
  • 4-5 slices of Galangal
  • 1/2 stalk lemongrass
  • 2 kaffir lime leaves
  • 1 Thai shallot
  • 2 small red chilies (optional)
  • 2 tablespoons fish sauce
  • 1/2 tablespoon rice malt syrup
  • 1 tablespoon lime juice

Method

  • In a saucepan add the coconut milk and bring to half boil then add in the chicken and stir until the meat is half cooked
  • Add the fish sauce, sugar, and lime juice.
  • Mix well
  • Add in all the herbs and wait until it boils.

If you like a creamer soup then add more coconut milk and less water

12424527_763678040429539_1528531475_n

Canned Soup Anyone?

Now that I have made you all hungry I want to look at why you should reach for your knife and chopping board instead of the can opener. In my research I came across this article entitled “The dangers of eating canned soup” I thought I would share a few highlights from this article that really shocked me. I do realise that it is not Australian based but it did make me wonder what is  hiding in our cans of soup.

screenshot-2016-11-02-11-02-49

  • Most soups come in cans, and most cans contain BPA.
  • MSG is often used to flavor canned soups – while a brand may not be directly putting MSG inside your soup, MSG can be found in other ingredients and can hide under names.
  • Many soups are high in sodium, with upwards of 400mg in a can.
  • Canned soup likely contains GMO’s

You can read the whole article in full at – http://mamavation.com/2015/03/dangers-of-eating-canned-soup.html

So What Is The Best Choice?

Make Your Own Soup!

happy-quotes-1733

Frozen Gems

Since living in Jakarta I have discovered my freezer. I never really used my freezer well in Australia mainly, I think, because there was no need to.  If I needed something and didn’t have it I could jump in the car, go and get it and be home in around 20 minutes. Not quite the case here in Jakarta!

As I now think about my freezer and how I use it, 2 people come to mind. Firstly my  mum. She could always dive into the freezer (of which we always had two) and pull out cakes, preserved fruit, all types of meat, and complete meals that just needed defrosting and heating. It seems that no matter what came up or who popped in for a visit or meal she could go to her freezer and pull out what she needed.

Secondly is my girlfriend.  Her freezer is jammed packed full goodies – broths, stocks, leftovers and hidden treasures. I can remember always thinking “How is she going to fit that in the freezer? or “Where did she get that from?” Her freezer help her cook a yummy meals.

In my opinion, they are two very different types of freezers – old school and new school. Both are well used and I think I have a bit of both in my freezer. If you open the door and have a look inside my freezer you will find a variety of items such as pesto, broths, meat, veggies, fruit, leftovers, tomato pasta sauce, and fats. All of the different freezers help to save with food waste which is important I think.

I have worked out that it is very convenient here to have some staples in the freezer as popping to the shop for me can be quite a journey. I have also learnt that when you see an item in the store you grab it and one (or more) for the cupboard or freezer.

One important area to remember is food safety so here is a guideline from Sarah Wilson’s website –

How long to freeze your food for:

•Meat soups: 2 months.

•Vegetable soups: 3 months.

•Cooked meat: 2 months. (If possible, slightly undercook any meat that is going to be reheated.)

•Cooked fish: 1 month.

•Partially cooked and frozen vegetables: 3-6 months. (Generally they don’t need to be defrosted prior to cooking, although some leafy green vegetables are much easier to separate if defrosted a little bit first.)

•Baked muffins: 3 months. (Freeze in individual bags or in a single container with sheets of freeze paper between the muffins so they can be easily separated.)

Here’s how I do it:

•Use snap lock bags for freezing – meat, veggies and fruits.

•Par cook my veggies until they are about 60% done, then put in cold water to stop the cooking process and finally, place in zip lock bags – take out as much air as possible then freeze. I buy up big when veggies and fruit are in season and freeze them in this way.

•All leftovers are frozen ready for another meal or someones lunch

•If I make too much rice or pasta it is frozen

•When I make big batches of pesto, wrap them in cling wrap in a sausage shape then freeze them. When I need to add pesto I cut off the amount I need.

•Freeze leftover sauces, small amounts in cube trays and for larger amounts I use old jam jars that Ive collected.

•I get big blocks of cheese here so I grate them and put them in ziplock bags to freeze


A few other ideas from Sarah – 

cleverhacks

In writing this post, I realise that one area I do need to work on is labelling and dating my ziplock bags and containers so that I know what it is and when I put it in the freezer. That way I will know what gems I have hiding in my freezer!

everyday_recipes_for-your_freezer_squash_soup_1981_preview

A final bit of information; how you defrost your frozen gems is also quite important. One should defrost foods in the fridge, not on the kitchen bench as the slower you defrost, the closer it resembles its pre-frozen state.

Sarah has some other good tips on this webpage – http://www.sarahwilson.com/2016/04/14-fave-freezer-hacks-you-can-pin-on-your-fridge-now/

My freezer

A few photos of some of the gems I keep in my freezer….

Oil to reuse in a jar, veggies in ziplock bags, my pesto sausages, tomato pasta sauce, and grated cheese.


“That was one of the best things you have ever cooked!”

I’m sitting in the car on the way to my school for a meeting and wondering what I should write about for this week’s entry; waiting for some kind of inspiration to fall from the sky! My mind is also thinking about what I’m going to cook for dinner tonight.  I can still hear my 13 year sons words that he said after dinner last night “that was one of the best things you have ever cooked mum.”  It then dawns on me that that is what I am going to share with you this week.

A bit of background – I find meat in Jakarta hard to buy, but think I over think it! I have discovered a place where I can source organic chicken and when I’m at Hero supermarket and see Australian mince, I stock up. From the embassy I can also get some Australian beef sausages. It certainly pushes my kitchen creativeness to the max to come up with new meals using 3 types of meat only.

On Tuesday, I was staring at my pack of sausages trying to think of what to do with them. In the past, I did either sausages, mash and vegetables, sausages, mash and salad or sausage and pasta. I didn’t really feel like any of these, so what does one do when they have a problem? Turn to google!  I saw these –

easy-sausage-rolls-11885_l

This made me think that perhaps I could turn my humble sausages into sausage rolls – one of my son’s favourite things to eat and something that you can’t find in Jakarta.

So here is what I created.

My Sausage Rolls

Pastry

*You can use store bought puff pastry sheets but it is easy to make your own. This is David Gilespies pie pastry recipe. I usually make the whole amount and put the leftovers in the freezer ready for my next creation.

Ingredients –

  • 225g butter
  • 2 1/2 cup plain flour
  • 1 teaspoon salt
  • 1 cup of ice cold water

Method –

  • Place flour and salt into food processor
  • Cut butter into small cubes
  • Add butter
  • Blend until it looks lite breadcrumbs
  • While the processor is going add the ice cold water until dough comes together – you may not require all of the water
  • Take dough out of food processor and wrap it in plastic and place into the fridge until its required

fullsizerender

Filling

Ingredients –

  • 1 carrot
  • 1/2 onion
  • 1/2 teaspoon of rosemary (dried or fresh and could be substituted for any herb)
  • tablespoon of freshly chopped parsley
  • 1 egg
  • 10 crackers or equivalent breadcrumbs
  • 4 fat beef sausages (Once again they could be a different meat)

*You could add in other veggies likethifnly sliced beans or zucchini

fullsizerender-7

Method

  • Bash your crackers until they are like breadcrumbs (I usually put mine in a ziplock bag to contain the mess)
  • Grate carrot
  • Dice onion finely
  • Take the skin off of the sausages and place in a bowl
  • Add in all of the ingredients into the bowl and mix very well – I like to get my hands into the mixture!

img_3525

Making

  • When both parts are ready take your dough out of the fridge and cut it into 4 pieces.
  • Roll out one of the four pieces of dough thinly
  • When it is ready add your meat in a long sausage shape along one edge of the dough.
  • Roll the the dough around the meat
  • Place sealed edge on the bottom when placing it on a baking tray.
  • If you would like to get fancy you can do an egg wash to seal it and to add some sesame seeds or poppy seeds to the top.

fullsizerender_1fullsizerender_2fullsizerender_3fullsizerender_4

Cooking

Depending on how thick you like your meat to how many sausage rolls you can make. With my mixture I made 2 rolls. Cooking time will also vary depending on meat amount and thickness of your pastry. As a guide, I cooked mine for 25-30 minutes.

Eating

They are yummy both hot and cold, and can be served with a salad or hot veggies. I plated mine with mash and a salad and of course some homemade tomato sauce!

I’m about to make my second round for school lunch boxes if they survive the afternoon snack time rush.

img_3532

Hope you enjoy them as much as my son did and that you are lucky enough to get a comment like –

“That was one of the best things you have ever cooked!”


After school snack idea

The food area I have been struggling with while living in Jakarta is after school snacks for my teen kids.  They walk in the door after school and the first thing I hear is –

“Im starving!!”

So here is an idea I came up with to help with the after school munchies!

Crepes

pancakes pile against white background

My Crepe mixture

Ingredients –

  • Flour (wholemeal or white)
  • oil (coconut or olive)
  • milk
  • salt

Method –

  • Place all the ingredients into a bowl and mix.
  • Add more milk if batter is too thick
  • If batter is lumpy give a quick mix with a hand blender.
  • Heat some oil or ghee in a frypan and spoon in batter – spread it out to make thin crapes.
  • I have discovered that I can make them in my sandwich press with no extra oil or butter needed and they cook in a flash – no sticking!!

img_2788

I usually make a small amount as it goes a long way.  If the kids are still hungry it only takes a moment to make more batter. The amounts I have given are based on 6 large crepes.

Toppings –

This will depend on your child and what they like.some ideas are –

  • Fresh fruit, yoghurt and muesli
  • Grilled banna and yoghurt – add a sprinkle of cinnamon
  • Ham and cheese
  • Bacon or chicken, cheese and tomato … and pineapple
  • Salad veg – tomato, cucumber, carrot, lettuce, herbs etc…
  • Marinated meat and veg

There are endless combinations – be creative!!

You can put the ingredients out and let the kids make their own. I’m sure they will come up with combinations you never thought of!!

I have also used the same ideas for a quick evening meal.

Its healthy and fun to eat.

Hide and Seek

Come out, come out wherever you are..

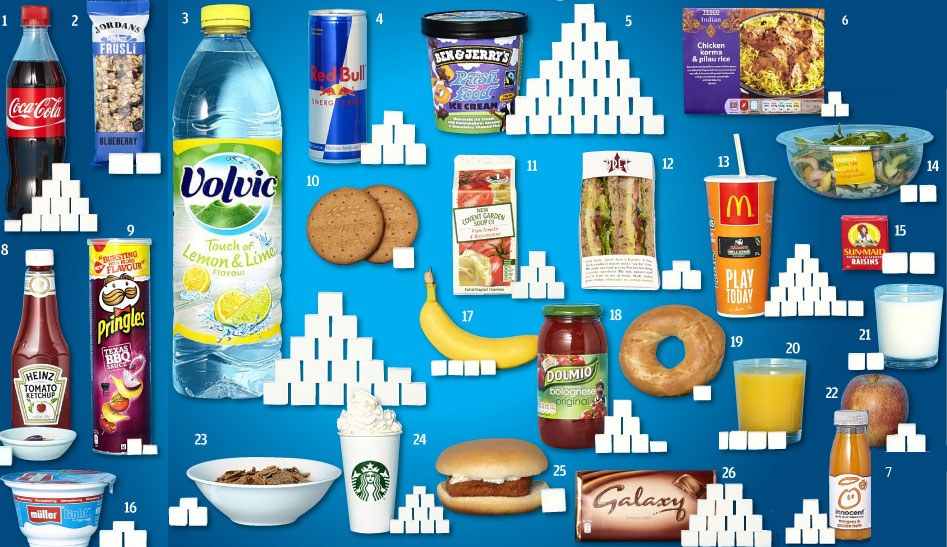
Do you remember saying these words when you played hide and seek? This week I thought I would go in search of some of my favourite foods and find find out how much sugar they have hiding in them. Once I know how much sugar there is I can calculate how much is fructose and whether it is on the “naughty or nice”list.

Fructose is the unhealthy part of sugar making up 50% of table sugar, with glucose being the other 50%. I have been reading the nutrition facts found on the back of products to deduct whether the foods are ok or not.

In my daily eating I aim to avoid eating any added sugar but I know this is not always achievable, especially when you eat out.  When this happens I try my best to order foods which I think will be lowest in sugar.

 I do not consider fresh fruits and vegetables as having added sugar.

This is how I go about reading labels.

4025e1448558043o8663

Step 1:

This item has 22g of sugar per serving which in this case is a 36g serving.

There are 4g of sugar per teaspoon

Therefore this product contains 5.5 teaspoons of sugar per serving

Step 2:

We then divide this by 2 and find out that 2.75g of the sugar content is fructose.

Step 3:

Sugars can be included in with the carbohydrates: This tells you how much of the total carbohydrate is sugar. This includes ‘added sugar’ as well as naturally occurring sugars from fruit (fructose) and milk (lactose) if they are ingredients in the food.

Remember ….

Check the serving size, then look at the number of servings at the top of the label and assess whether you’re likely to eat more or less than this. If you’re likely to drink a whole carton of juice, for example, and the servings per carton is 2, you’ll need to double the amount of sugar.

Ingredient List

All packaged foods must have an ingredient list on their labels. All ingredients are listed in descending order by weight (ie: the ingredient that weighs the most is listed first and the ingredient that weighs the least is listed last). This allows you to work out roughly how much of the ingredient the food contains, which can help you decide whether or not you want to buy the food.

http://diabetesnsw.com.au/wp-content/uploads/2014/12/DA-30-Reading-food-labels.pdf

I  see you!!

Lets have a look at some of our foods and the amount of sugar in them –

(From Sarah Wilson’s website – https://iquitsugar.com/how-much-sugar-in-food/)

image-20160523-9538-103yzr8

Healthier drink options such as iced teas, coconut water, juices and smoothies can be a big culprit when it comes to added sugar. Some medium-sized smoothies have up to 14 teaspoons of sugar (63.5g) in a 475ml drink. Flavoured milks can also be high in added sugars so its worth reading the label before you buy.

image-20160523-9531-1imi8lnMy family struggled with this for quite a while as we were big breakfast cereal eaters.  We now often chose another option or choose weetbix or cornflakes.

image-20160523-9554-12dgym4

This is another area that we have changed quite a bit in – we all loved our tomato sauce!! Instead, we now add fresh tomatoes to our food.

image-20160523-9565-aks7h2

Once again you can easily think that you are doing the right thing by choosing what appears to be the “healthy” option of snack only to discover it is full of sugar.  Also watch the snacks that are made with dates – they are more than one third fructose and their total sugar content is over 60 per cent.

image-20160523-9562-hjf1y4Well we knew that these were never going to be good – but here are the facts!!

It is so easy for the hidden sugars to sneak up on you – before you even realise, you are over your daily limit. I see this as another good reason why I like to cook my own food – I know for sure what is going into it and therefore into mine and my families bodies.

I hope you win the sugar game of “hide and seek!”

screenshot-2016-09-28-08-59-45

Feature image – sugar-in-food.jpg

Bear image – http://media.topito.com/wp-content/uploads/2015/08/huf-fire.jpg